In the winter of 2015 - 2016, Dona and I
visited New Zealand.
While there, we visited a grove of
Coastal Redwoods someone had introduced way back when
and in which the enterprising Kiwis have now built a
Tree Walk.
It looked like a cool idea, and we have lots of big Ponderosa Pines,
so I took a lot of pictures.
I started back in 2016, working on it a little here and a little there.
This year we are more are less done.
Unfortunately, I didn't take very many pictures of the process.
DISCLAIMER: Do not try this at home. Your mileage may vary.
Success / failure / major medical problems are dependent on your skill level and attention to detail.
You should be able to properly select material, such as appropriate webbing material and polyester thread for sewing the chokers,
as well as appropriately strong lumber, steel, cable, and aluminum channel.
You should know how to cut cables (a big hammer and cold chisel and a steel backing block work fine),
and properly attach cable clamps, among other things.
It went something like this:
- Weld up a steel octagon frame with cross members in two directions,
which will leave a hole in the center for the tree.
- Cut out one side so it can be slid around the tree.
- Weld tabs onto the cutouts so they can be bolted back in place; drill and fit bolts.
- Drill 1/2" holes near each corner for attaching eye-bolts.
- Attach 1/2" eye-bolts to each corner.
- Drag it over and slide it around the tree, bolt the cut out pieces back in place.
- Make or buy some super strong chokers long enough to go around the tree and then some.
You will need eight chokers for the platform, and two more for the bridge.
- Gather up / borrow block-and-tackle (4:1 advantage) and come-alongs.
- Climb up the tree and put eight chokers around it about 40 feet above where you want the platform.
- Attach block-and-tackle and come-along to separate chokers on opposite sides of the tree,
and opposite corners of the frame on the ground.
For come-alongs, one end of each rope should turn a pulley at the choker and be attached to
the come-along down at the ground.
The ground end of the block-and-tackles or come-alongs should be attached to something sturdy such as a tree.
- Attach lines to steady two other corners through pulleys on the corresponding chokers,
90° off the block-and-tackle / come-along.
- Call up some friends and have them come over.
- Hoist up using the block-and-tackles / come-alongs, steadying with other lines as necessary.
For come-alongs, it will be necessary to tie off the hoisting line and reset the come-along several times
before the platform is at the desired height.
- Tie it off and have a drink.
- If you have an extension ladder long enough, you can set it up to access the platform.
Otherwise, you'll have to climb your ropes as you did to get the chokers and ropes up in the first place.
- Come back later and attach cables with turnbuckles at the bottom, one to each corner,
each to a separate choker way up there.
Begin attaching cables at the four corners to which nothing (come-along, steadying ropes) is attached.
Once those four corners are supported, the ropes used to hoist the platform can be replaced with cables.
One would be wise when working on one corner to put a counterweight on the opposite side of the platform.
Try to keep your body weight inside the line between the two corners either side of the corner you are working on.
- Adjust turnbuckles and cable lengths until the platform is more or less level.
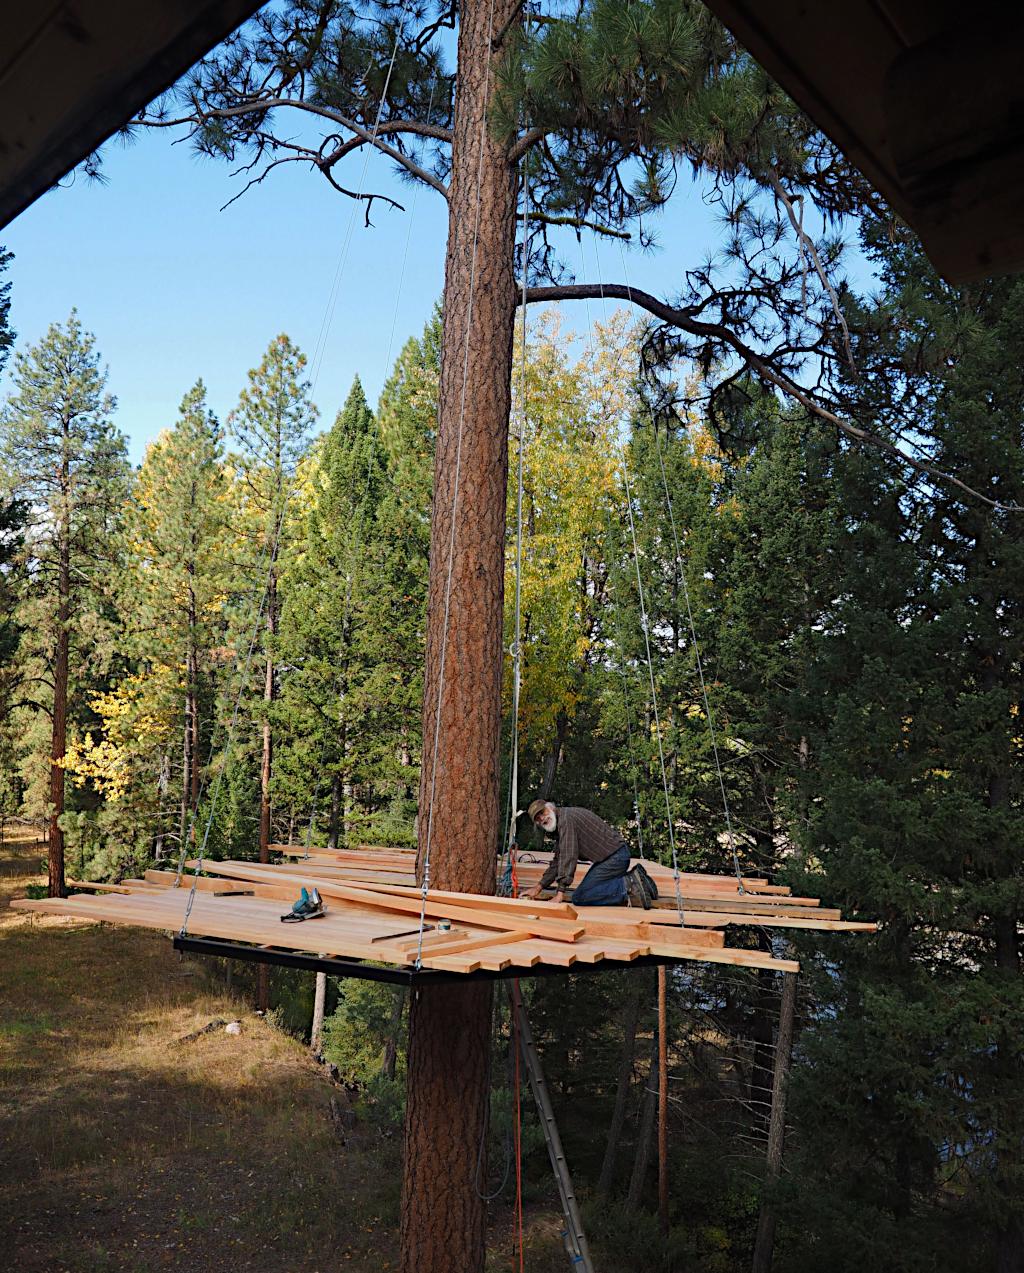
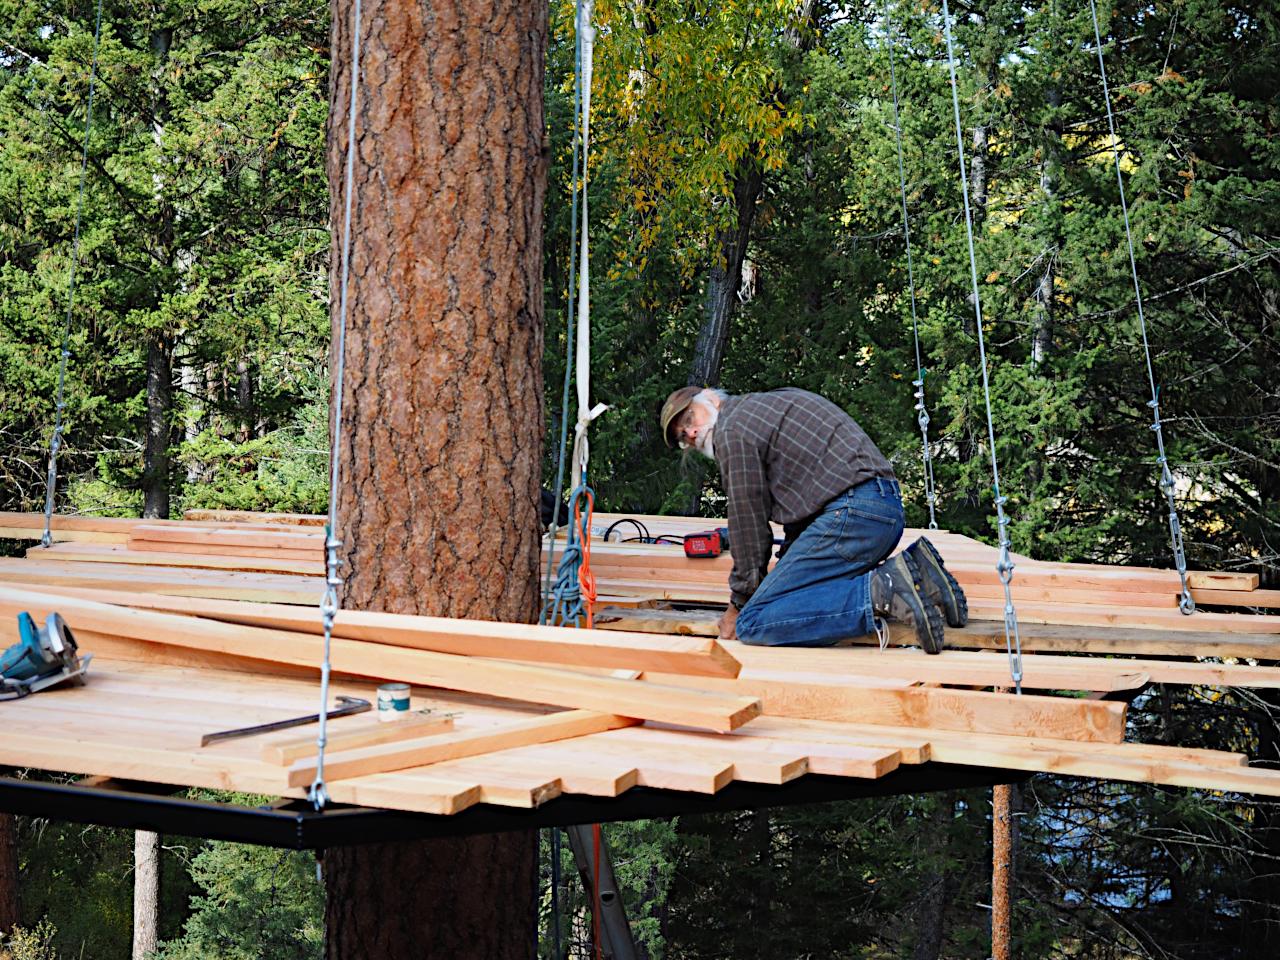
- Haul up a lot of lumber, saw, drill, etc.
- Fit joist hangers between the steel framing to support intermediate 2x4s and bolt/screw in place.
- Fit 2x4 joists and screw in place.
- Fit 2x flooring and screw to wooden joists, bolt through steel framing.
That gets you more or less to the images below.
Working on the Floor shortly after Raising the Frame
Before you screw the floor all down:
- Frame a hole for a trap door.
- Drill 1/2" holes lined up in the center of the sides of the steel frame square
that fits around the tree.
- Attach 2x4 rub blocks to the end of 1/2" all-thread going through the holes;
the purpose of these is to reduce the movement of the platform around the tree.
- You need six nuts per piece of all-thread, and some washers and lock-washers:
- One on tree side of the rub block, countersunk
- One on the other side of the rub block
- One on the tree side of the steel frame member
- One on the other side of the steel frame member
- One on the tree side of the next cross member, a 2x4
- One on the other side of the cross member
After the floor is done, make some funky brackets from steel or aluminum strap
about 8" long, with four holes horizontally. Two about two inches apart to bolt into the end of the railing pieces,
and two set the appropriate distance to attach the 'U' part of a wire cable clamp.
See the pictures of the New Zealand tree walk linked at the top of this page.
I have not included pictures of mine as I don't want to show you my crude workmanship by comparison...
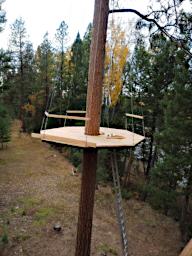
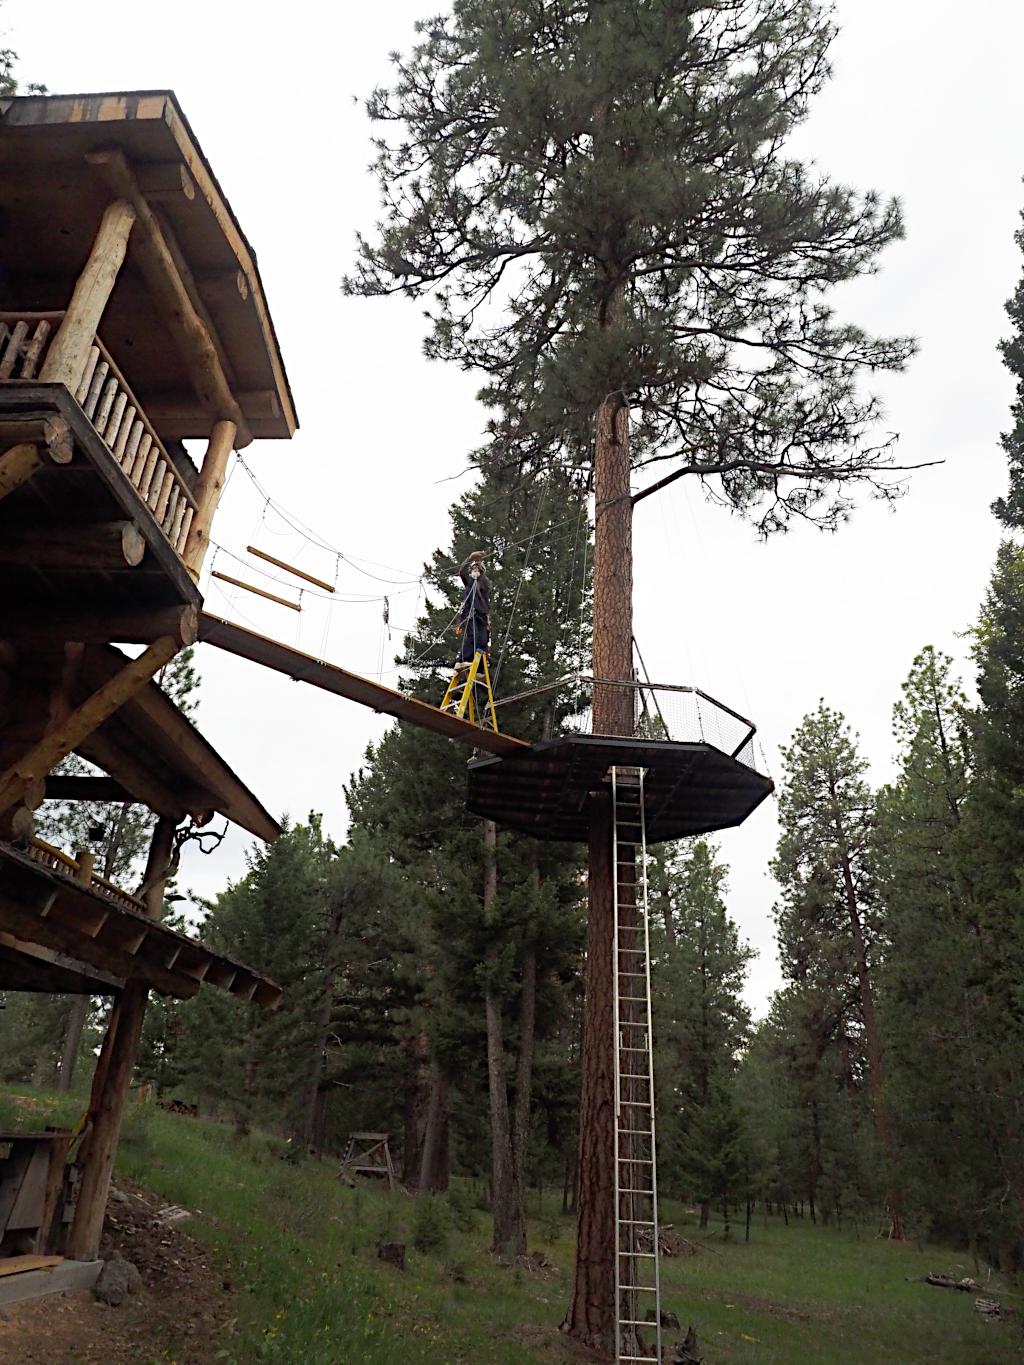
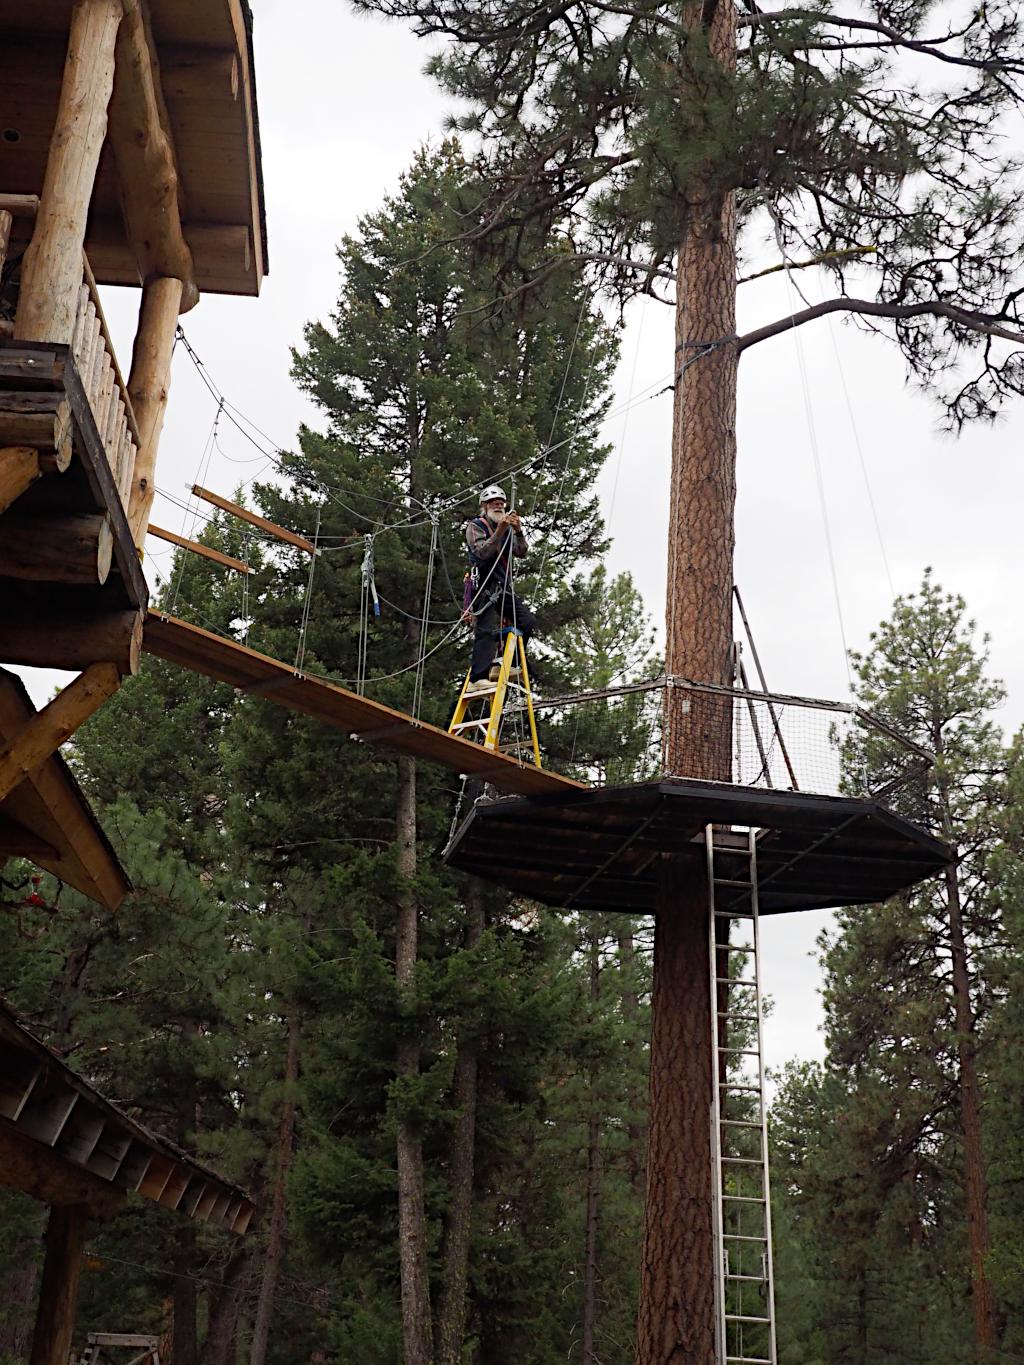
Floor done, Railing partially complete
After the railing is up, get some 2" square netting or similar.
Mine is from
Golf Range Netting
and is apparently used for soccer nets, driving ranges, etc.
Figure out some way to attach it to the railings and the floor.
I drilled 3/8" holes about 10cm apart in the railings and tied the netting up with climbing accessory cord,
then used 1/2" EMT tubing threaded through the net at the bottom and through loops of cord in the floor.
That way the EMT can be removed if you want to be able to push things like snow off the floor,
although I've generally just shoveled and thrown it over the railings.
At this point you have a platform,
but you can only access it via a long ladder through the trap door.
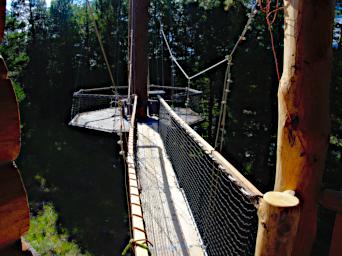
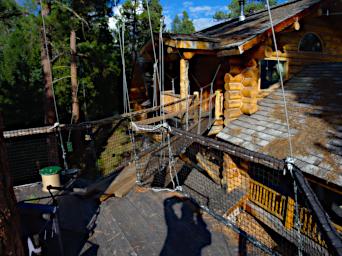
More fun is if you have a bridge from the house, so...
- Get some 5/8" by long eye bolts.
- Attach eye bolts to logs on house / balcony, up high.
- Put two more 6,000# chokers around the tree about 15 feet above the platform.
- String 5/16" cable from the tree to the eye bolts.
- Cut an appropriate number of 26" aluminum U channel cross members to tie the bridge floor boards, which run length-wise,
cross-wise to each other.
- Cut 1/4" cables and put thimbles in one end, with the thimble around the 5/16" cable.
Fasten with three cable clamps.
- Thread the other end of the cable through a hole in the aluminum channel and back up,
then fasten it using cable clamps (3) at approximately the right length,
guesstimating where you want it to ride on the suspension cables.
- Repeat the last two steps for the opposite end of the aluminum channel.
- Slide the channel on its cables out as far as you can on the suspension cables.
- Lay your first two floorboards from the balcony out to the aluminum crosspiece.
You can lay all four if you want. Do not bolt to the U-channel yet, as they will be slid further out.
- Tie yourself into your climbing rope, with protection from the eye-bolts and carabiners on the cables.
- Walk out to the aluminum cross piece and rig up the next one.
- Slide the second one out to about where you want it,
then lay two more floorboards, staggering them between the original two,
and extending to the new aluminum cross-member.
The thimbles for the suspension lines holding the aluminum cross-members can be held in position
(prevented from sliding down to the low point)
on the 5/16" suspension cables by attaching another cable clamp below them on the 5/16" cable.
- Repeat the above procedure until you are all the way across to the tree platform.
It took me four aluminum U channel cross members and two lengths of 2x14 select #1 fir 2x6s
(purchased 29 years ago...) to make the span.
(All told 8 2x6s).
- Where the 2x6s have a joint (the two places closest to the middle in this case),
I used two pieces of U channel side by side, with the end of each board on the different pieces.
A single cable suspends the end of the two aluminum channels,
going down through a hole in one, making a U turn and coming up through the adjacent channel.
-
I layed out the 2x6s like this:
 =====================||==================================

 =================================||======================

 =====================||==================================

 =================================||======================

           u          uu          uu          u
U channel is underneath the boards where there is a 'u' above.
Boards are bolted to the U channel wherever they cross.
"||" indicates the end of one board and the beginning of the next.
The end of the first board is bolted into the first U channel in a pair,
and the start of the next board is bolted to the second U channel in the pair.
- Bolt the 2x6 planks to the U channel.
I used 1/4 x 20 machine screws with fender washers on the wood and lock-washers and regular washers below.
- Attach railings as done for the tree platform.
I did this as I went along, but had to adjust the height where they attach to the cables whenever I adjusted the cables.
- Adjust the suspension cables until the bridge is hanging the way you want it.
- Attach netting as done for the tree platform.
I probably should have engineered the thing properly and cut the cables precisely,
but because the house / balcony end has suspension points which are not located opposite each other
perpendicular from the cables it would have been a bit awkward.
(read: I'm not sure how.)
I am delighted at how strong the planks are.
I suspect the bridge would support my weight without the suspension cables.
The aluminum cross-members tie all four pieces together horizontally,
and everywhere there is a joint between two planks there are also two full length planks centered at that joint.
I can adjust the cables while standing on the bridge without using anything to support the channel I am adjusting —
it only takes finger strength to hold the cable in place while adjusting.
Platform done with Railing and Netting
Working on the Suspension Bridge
View from the House Balcony
View from the Platform
Remove the ladder because it detracts from the fun.
Hoist up / carry over from the balcony a table and chairs, sleeping pad and sleeping bag, etc.
Enjoy!