All of the ceilings in the house are tongue and groove paneling. Some of the material was purchased, but I've had so much timber killed and blown down I decided I might as well make it myself, so the stuff I've been putting up here on the home stretch is stuff I milled on my sawmill and then made up with a planer and shaper. It's a lot of work and not really worth it time-wise, but if you have more time than brains it works out.
Putting up paneling isn't difficult, but it is pretty awkward if there is only one of you. I had sixteen foot pieces for this project, as I didn't want any splices. The main problem is getting the paneling up against the floor joists and holding it in place while you get the tongue and groove to mate, and then snugging it up while you nail it.
I finally figured out a way to do it which went pretty smoothly, so I took a few photos which I thought I'd pass on.
The first order of business is to make and scrounge up some tools:
 |
| Tools you make |
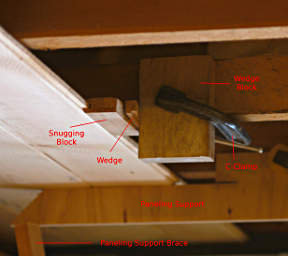
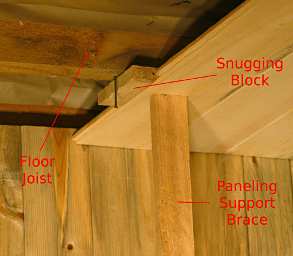
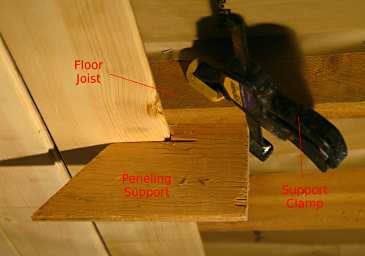
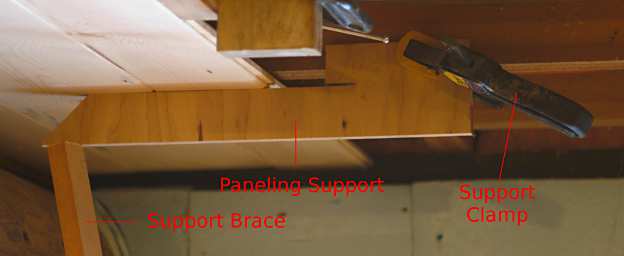
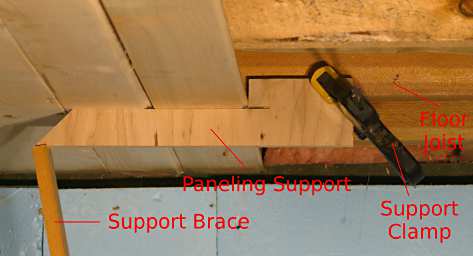
The paneling supports are pieces of scrap plywood cut into an "L" shape so they can be clamped to a floor joist and give the paneling piece a place to rest without falling down. Paneling support braces are long sticks cut just a tad longer than the distance from the floor to the bottom of the paneling when installed. They can hold up the end of a piece of paneling by themselves if it is stable and doesn't want to move sideways, or they can be used to hold up the free end of the paneling support so keep the weight of the paneling from causing it to rotate downward. Snugging blocks are used to put pressure on the tongue edge of the paneling without damaging it. They are just scraps of the groove part of some paneling, cut 10cm (4") or so long. Wedge blocks are short scraps of 2"x4" or similar junk material used to give the back side of a wedge a surface to bear on when forcing paneling in place with a snugging block. The wedges you'll need should be about 1cm at the fat end and 1 or 2cm (1/2" - 3/4") wide. They are used to snug the paneling up to its neighbor and hold it there. Hardwood works best, but they can be made from scrap paneling or other material as well. They self-destruct faster if they aren't hardwood, but that's no big deal.
Other tools you'll need are hammer and finish nails (doh; sometimes I use a pneumatic nailer!), and some clamps large enough to clamp the paneling supports and wedge blocks to the overhead floor joists to which the paneling is fastened. I use a combination of C clamps and some Quick Grip bar clamps. You can get by with one step ladder, but if you've got two it will make it easier.
Measure the width of the room at each end where the ends of the paneling will butt up against the wall. If the measurements are not close to the same, you will probably want to figure out a center line that splits the difference, then taper the first board which is against the wall to make everything square. If it's way off, that may not look good. There are ways of gradually making up the difference, but they are a pain in the neck and I'm not going to go into that here.
Select a straight piece of paneling for the first piece and cut it to length, perhaps 4mm (1/4") short to give you some working room. Clamp one of the paneling braces on the last or next-to-last floor joist at one end, with enough space between the upper edge of the long part of the "L" and the floor joist for the paneling to slip in the slot easily. You may want it angled down a bit so it's easier to get the paneling in the slot; you can always tighten it up after the paneling piece is raised. Space the paneling support out from the wall a few inches. Then slide one end of the paneling into the slot, with the groove side towards the wall. If the paneling is not the same on both sides, make sure the good surface is facing down to the room. The weight of the paneling on the paneling support will likely cause it to want to rotate downwards, in which case the paneling can slip off. Use one of the paneling support braces to prop up the tip of the paneling support to prevent it from rotating. If you're working in tight quarters, you may need to initially position the paneling support farther out from the wall. It can be moved in once the whole piece is raised.
Then raise the other end of the paneling up to the joists and slide the far end (the end sitting on the paneling support) all the way so it butts against the wall. Clamp another paneling support in place to hold up the end you have just raised, and snug it up against the wall. Quick Grip bar clamps are handy for this because they can be operated with one hand while the other hand is holding the paneling and its support up. Move to the center of the board and put up a third support, and slide the first support up closer to the wall and raise it all the way up so the paneling is flush against the floor joist.. Brace the ends of the supports as necessary.
You now have the first board snug up against the wall. If the wall is not straight, you may need to cut the edge of the paneling to fit the wall. The actual corner joint will (normally) be covered with a piece of trim later, but if it's too far out you'll want to cut the first board to fit. Take a compass (the drafting kind used to draw circles, not the direction finding magnetic kind), set it for the widest gap, and then draw along the board while holding the point of the compass against the wall. This will trace the contour of the wall onto the board. Take the board down and cut along the line. Put the board back up and snug it against the wall. If you've been careful with your compass and cutting work, it should be pretty close -- plenty close enough if it's going to be covered with trim.
It is possible to force the paneling up against the wall for a really tight fit, but you generally don't want to do this because the tongue edge of the board will no longer be straight, and all of the rest of your boards will have to be bent as well. You can do that, but it makes for a lot of extra work. Besides, it's unnecessary because the trim will hide whatever slight gap remains. Nail the board up, face-nailing the edge closest to the wall and toe nailing the tongue edge so the groove from the next piece will cover the nail.
Cut the next piece to size. Move the paneling support at the starting end out so there's room for the new piece, and take the rest of the supports down or move the rest out on the joists and temporarily clamp them there so you don't have to get off the ladder to get them (saves time). Slide the next piece into the slot on its support, raise it up and slide it home, and clamp it in place.
Take a snugging block and place it over the tongue at one end of the board. If the groove will mate with the tongue nicely, slide it home. Tapping on the snugging block with a hammer does wonders, but don't overdo it. If it doesn't want to go, check to be sure the groove and the tongue are properly aligned, then tap gently again. If it slides all the way home, tap a nail into the joist to hold it there, so the paneling doesn't pop out while you're working to get the rest of the long groove to mate. Otherwise, clamp a wedge block onto the joist closest to the end with a small gap between its edge and the back face of the snugging block. Align the snugging block so its edge is opposite the wedge block, but not covering the joist (so you will be able to nail into the joist without undoing it). Tap a wedge into the gap to force the new piece of paneling up against the first piece. Look at the groove - tongue joint and see whether the edge of the new piece needs to be raised or lowered to match the tongue, then tap it whichever way it needs to go. Because the wedge is applying pressure, it should pop into place. Once it pops into place, gently tap the wedge in further to force it further home, but don't be over zealous until you have the whole groove mating. When mating the groove with the tongue, it usually works best if the end farthest from where you start is 1cm (1/2") or so away from the tongue, so you can work with a small section of groove and tongue at a time. If you try to make the whole thing go together at once you'll drive yourself crazy; gravity makes the board want to sag in places so they generally don't line up along the whole edge at once when the new board is mostly freely suspended.
Work your way up the groove until the whole thing mates. It's usually easiest to snug the free end of the paneling supports up against the already-installed piece of paneling before trying to get the groove to mate, as that will usually align it pretty well.
 |
 |
 |
| End Stop | Wedge | Paneling Support
Note groove is not yet mated with tongue. |
 |
| Paneling Support |
 |
| Paneling Support |
The last piece is always a bear to get up, as there's no place to clamp the paneling supports. I cut the piece to length and then support it at each end and in the middle with a support brace. Then I snug it up to the wall, and measure how much has to be cut off at each end to fit. It the wall is straight enough, which it usually is, you can snap a line between the two points and cut the board to fit. Then raise the board again and brace it in place to check if it really does fit. If not, mark and cut until it does. When it fits, you can sometimes fit the groove next to the tongue with the cut-off edge of the board inclinded down, then using a 30 cm (1 ft) or longer backing block slowly pound it into place. However, this method often breaks off the tongue and almost always scratches the wall. It's far easier to cut off the back piece of the groove, so it is just a lip. Then it will just raise in place. You can force it flush with a wedge between the far edge and the wall, then nail it home.
If you have questions or comments, you may contact me at garya at this domain.